Back to P6 Home
P6 C) Wave Experiments
P6 C) Wave Experiments
We are going to have a look at 4 different experiments that we can use to investigate waves. The first two experiments involve sound waves and the other two experiments involve ripples on water and string.
Sound
Sound is a longitudinal wave; the oscillations are parallel to the direction of travel.
Experiment 1
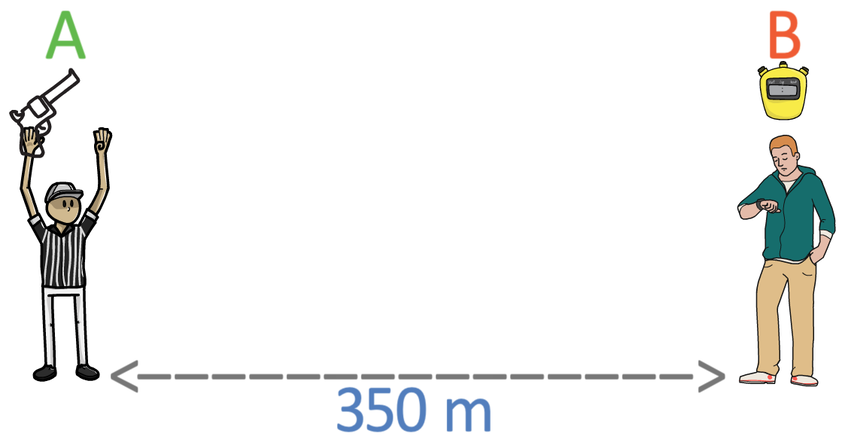
The first experiment will find an estimate for the speed of sound. The experiment works because light travels much faster through air than sound. We undertake the experiment by having two individuals standing a known distance apart (such as 300 metres); we can measure the distance between the two individuals by using a distance measuring wheel. I am going to call my two individuals A and B.
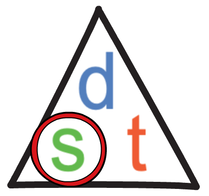
Individual A will hold a starting pistol above their head (the starting pistol will be the same pistol that they use to start athletic events). Individual B will then measure the time between seeing the gun being fired (light reaching individual B) and hearing the bang of the gun (sound reaching individual B). We can then use the distance between the two individuals and the time taken for sound to reach individual B to work out an estimate for the speed of sound; we work out an estimate for the speed of sound by dividing the distance by the time.
In the above formula, distance is measured in metres (m), time is measured in seconds (s) and speed is measured in metres per second (m/s). Let’s have a mathematical example.
Example
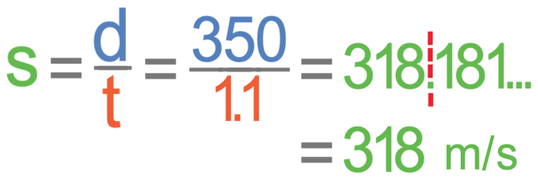
Two individuals investigate the speed of sound by using the method that has been outlined above. They stand 350 metres apart, and the time taken to hear the sound from the gun is 1.1 seconds. Find the speed of sound from their values. Give your answer to 3 significant figures.
We find the speed of sound by dividing the distance (350 m) by the time (1.1 seconds).
The speed of sound from their experiment is 318 m/s.
The actual typical speed of sound in air is 330 m/s (it is worth writing this down on a revision card).
Issues with this Experiment
This experiment is not the most accurate way of working out the speed of sound. This is because the time between seeing and hearing the bang has been measured by humans, which means that the time will be influenced by reaction times. If you have completed this experiment at school, you will have noticed that despite all of your class members watching and hearing the same gun being fired, they will all have different values for the time between seeing and hearing the bang. The range of times amongst your class members will mean that we will have a range of values for the speed for sound.
Experiment 2
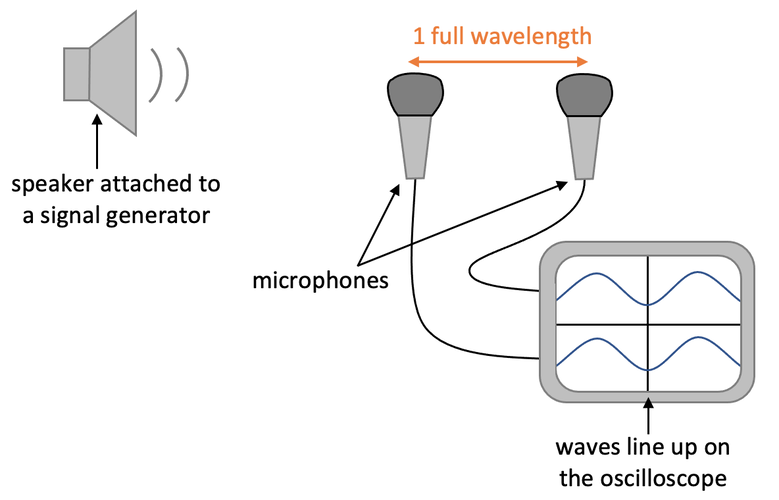
The second experiment uses an oscilloscope to measure the speed of sound. We connect a signal generator to a speaker to create sound with a known frequency (the frequency is the number of full waves that pass through a point per second). We then connect two microphones to an oscilloscope. The oscilloscope will show the waves detected from each of the microphones. The setup for the experiment is shown below.
The second experiment uses an oscilloscope to measure the speed of sound. We connect a signal generator to a speaker to create sound with a known frequency (the frequency is the number of full waves that pass through a point per second). We then connect two microphones to an oscilloscope. The oscilloscope will show the waves detected from each of the microphones. The setup for the experiment is shown below.
We start the experiment with both of the microphones at the same position; both of the microphones will be at point A on the above diagram. One of the microphones will stay at point A for the whole experiment. We then slowly move the other microphone to the right from point A. We continue moving this microphone further towards the right until the two waves on the oscilloscope are aligned (they look exactly the same); the two graphs will now be one full wavelength apart. The distance between the two microphones will be the wavelength; we can measure the wavelength with a ruler or tape measurer.
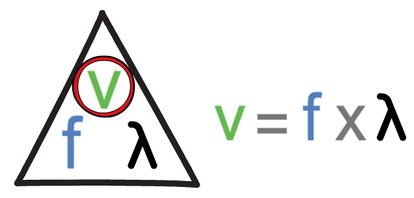
We can work out the speed of the wave by multiplying the frequency (which we get from the signal generator connected to a speaker) by the wavelength (the distance between the two microphones).
We can work out the speed of the wave by multiplying the frequency (which we get from the signal generator connected to a speaker) by the wavelength (the distance between the two microphones).
In the above calculation, speed is measured in metres per second (m/s), frequency is measured in hertz (Hz) and wavelength (λ) is measured in metres (m). Let’s have a mathematical example.
Example
A student investigates the speed of sound by using the method that is outlined above. She sets the frequency on the signal generator to 1.2 KHz. The distance between the two microphones is 27.5 cm. Find the speed of the sound wave.
We find the velocity of the sound wave by multiplying the frequency by the wavelength.
Frequency in this formula should be measured in hertz (Hz). The question tells us that the frequency is 1.2 KHz. There are 1,000 Hz in 1 KHz, so we can convert KHz to Hz by multiplying by 1,000; the frequency is 1,200 Hz (1.2 x 1,000).
The distance between the two microphones will be the wavelength. Therefore, the wavelength is 27.5 cm. Wavelength in the wave speed formula should be in metres. There are 100 cm in 1 m, so we can convert cm to metres by dividing by 100; the wavelength is 0.275 m (27.5 ÷ 100).
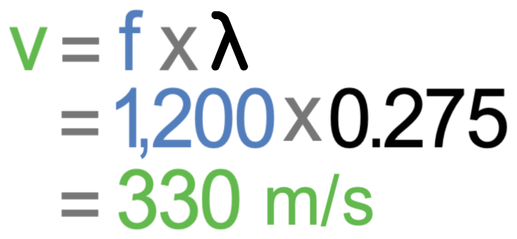
We now sub the frequency in as 1,200 Hz and the wavelength as 0.275 m.
The speed of the sound wave is 330 m/s.
Experiment 3
The next experiment will involve using a ripple tank. We can use a ripple tank to find the wavelength, speed or frequency of a wave.
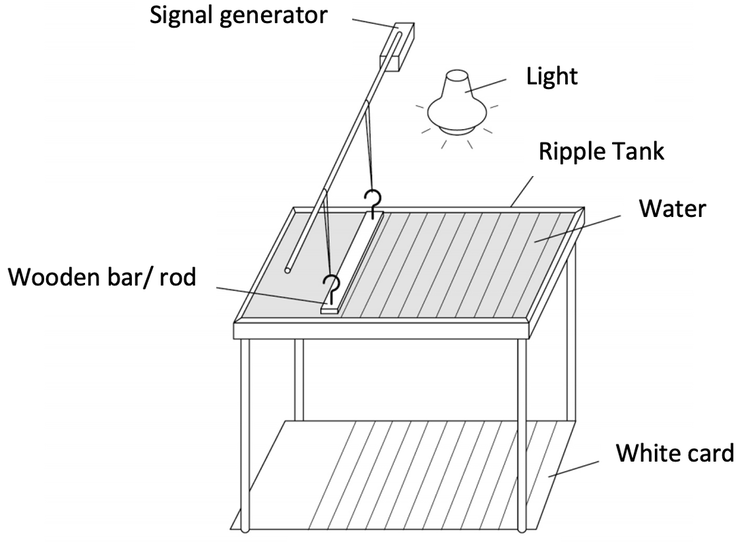
A ripple tank has a transparent tray of water with a lamp above that shines light down through the water. We place a bit of white card underneath the ripple tank. The crests of any waves will show up as shadows on the white card below the ripple tank. A signal generator is attached to a wooden bar/ rod that touches the surface of the water in the ripple tank. A ripple tank is shown below.
Before we carry out the experiment, we need to add some water to the tank so that the depth in the tank is around 5 cm. We then turn the signal generator on and adjust the wooden bar/ rod so that it just touches the surface of the water. The final step is to turn the lamp on and turn off the lights in the lab/ room so that it is clearer to see the shadows created on the white card below the ripple tank.
The distance between each of the shadows on the white card is one wavelength. Rather than measuring just one wavelength, we measure the distance for a number of wavelengths and then divide by the number of wavelengths that we measured to obtain the average wavelength; we do this to make our value for wavelength more accurate. We would usually measure between 5 and 10 wavelengths.
The frequency of a wave is the number of full waves that pass through a point per second. The frequency of the wave will be whatever we have set the frequency as on the signal generator. However, if you do not know what the frequency on the signal generator is, we can work it out by using a strobe light. We alter the frequency of the strobe light until the positions of the waves on the white card look unchanged between the flashes; the frequency of the wave will then be whatever the frequency is for the strobe light.
We can then work out the speed of the wave by multiplying the frequency by the wavelength.
I won’t go through a mathematical example as it will be very similar to the previous examples. But there is a mathematical question in the quiz for you to have a go at.
Experiment 4
The final experiment involves waves on a piece string. During this experiment, a signal generator is attached to a vibration transducer, which is attached to some string; this will cause the string to vibrate. The string from the vibration transducer goes over a pulley and has some masses/ weight attached to the end of it; the masses/ weight ensures that the string is kind of taught. The general setup for the experiment is shown below.
The final experiment involves waves on a piece string. During this experiment, a signal generator is attached to a vibration transducer, which is attached to some string; this will cause the string to vibrate. The string from the vibration transducer goes over a pulley and has some masses/ weight attached to the end of it; the masses/ weight ensures that the string is kind of taught. The general setup for the experiment is shown below.
There are two slight modifications that we can undertake for this experiment.
Modification 1 – Adjusting the Frequency
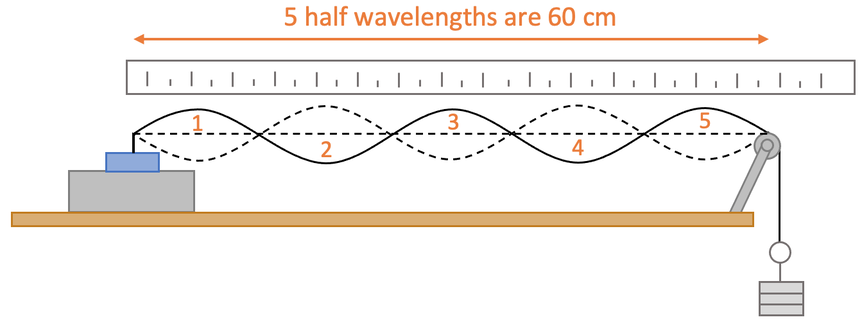
The first modification that we are going to look at involves adjusting the frequency. We start the experiment by turning the signal generator attached to the vibration transducer on, which causes the string to start oscillating. We then adjust the frequency of the signal generator until we see clear waves on the string; there will be parts of the waves on the string that stay in the same position. We will see something like what is shown below.
After we see clear waves on the string, we can measure the wavelength. We measure the wavelength by measuring the distance for as many half wavelengths as possible. We then divide the distance by the number of half wavelengths to get the mean half wavelength. The final step is to double the mean half wavelength to find the full wavelength. Let’s have an example.
We should always try and measure the distance for as many half wavelengths as possible. I am going to measure the distance for 5 half wavelengths, which is 60 cm. We find the mean half wavelength by dividing the total distance (60 cm) by the number of half wavelengths (5).
The mean half wavelength is 12 cm. We now double this to find the full wavelength.
The full wavelength is 24 cm.
We would then be able to find the speed of the wave by multiplying the frequency (which we know from the signal generator/ vibration transducer) by the wavelength (what we have just worked out).
We would then be able to find the speed of the wave by multiplying the frequency (which we know from the signal generator/ vibration transducer) by the wavelength (what we have just worked out).
Modification 2 – Moving the Bridge
The first modification involved changing the frequency of the signal generator. In this modification, we are going to add in a wooden bridge; this is shown on the diagram below.
We now switch on the signal generator attached to the vibration transducer, which causes the string to start vibrating. We then move the position of the wooden bridge until we can see clear waves on the string; there will be parts of the waves on the string that stay in the same position. We will see something like what is shown below.
We then use the same process to find the wavelength; measure the distance for as many half wavelengths as possible and divide by the number of half wavelengths to find the mean half wavelength. We then double the mean half wavelength to find the full wavelength.

